An awesome person commented on my instagram on how my review of the Burton Custom (Camber) was helpful and then we proceeded to talking about my bindings. It then gave me the idea to write about this: what to look for when buying snowboard bindings.
I’m going to take this from the perspective of possibly a first-time buyer or someone who isn’t familiar yet with the world of snowboarding. If this is you, then read on! This is perfect for you!
This isn’t going to be an article about reviewing the latest bindings and trying to sell the latest tech. I’m going to boil it down to the basics, the essentials. “What are the core things you need in a binding?”
Hole pattern
So, when you look at a snowboard (no bindings attached yet, just simply a plank of wood), you’ll see that there will be holes where the bindings would be screwed to. Sometime you will even see just a line instead of holes. That’s the Burton Channel system. So depending on the type of board you will be purchasing and what hole pattern it does, that’ll dictate what type of bindings you will have to buy.
By default, the most popular hole pattern is the 4-hole binding system. 80% of the bindings sold are for these. If by any chance you get a Burton snowboard, it’s probably a Channel system so you’ll have to buy a binding that’s compatible with that. Burton of course sells those. They’re called EST bindings.
They also have the “Re:Flex” bindings, meaning bindings compatible for the Channel system and the hole’d systems.
Sizing (between bindings and boots)
Notice we’re going through the basics here huh. You’d think I’m telling you something you already know but you”d be surprised how some people forget these. The next is sizing.
Once you’ve figured out the hole patterns, your next step is to find what binding size you should get. They come in S, M, L sizing. So how do you know precisely which should be for you? First, you actually have to purchase your snowboard boots.
Go to a shop and then find the boot that’s right for you. If you’re buying online…well if you’re a beginner I’d highly suggest against that actually. It’s much better to come in a sports shop, talk to someone who has knowledge about snowboarding and you can learn things specifically about your ideal boot (there’s the size, the stiffness, etc you have to figure out) or even about snowboarding in general.
If you really have to buy online, I wouldn’t base the sizing with your casual shoe size. What I do in general now actually is I actually measured my foot with a tape measure and then you’ll get your size in cm. Now every time I buy footwear, any type, I always just go to the product page, go to the size chart, then I’ll know the “size” for that brand, product, then I buy accordingly. I’d suggest you do this.
Once you’ve actually tested, tried your boots and everything’s perfect and fitting, then you go back to the snowboard bindings.
If you go online and check the product page of the snowboard bindings you’re looking at, there should be a button to show the “size chart” of the bindings. This will then show the size brackets. E.g.: size Small will fit size 6 – 8 snowboard boots. size Medium is for size 9-10 boots” etc etc.
You don’t want to buy a boot that is too big or small for the bindings.
Sizing (between board and binding, err- boot?)
So this article assumes that you’ve picked the right size of snowboard for you. If you’ve missed it, here’s my article on how to pick the right snowboard size.
That said, nowadays there are modern snowboards that are either volume-shifted snowboard (made intentionally to be shorter but fatter) or powder boards meant to be skinny but long.
So the only thing I have to say about this is you don’t want to have a boot(in turn, a binding supporting that boot) that’s too big for the board that your toe is hanging out too much.
This is called toe (or heel) overhang. It’s a problem because if you turn (meaning you bank your snowboard), if your heel or toe is poking out too much, it’ll then make contact on snow and then you’re basically tripping yourself. It’s like riding a fast-moving boat and then suddenly dropping anchor.

This can be caused by a number of things: boots too big for the board, or board too small for the boot, etc.
Basically if you buy the right size snowboard, bindings, and boots, you won’t ever have this problem.
Toe strap
So, you’ll notice that bindings have two straps: the bigger one securing close to your ankle, then another that’s securing your toe area.
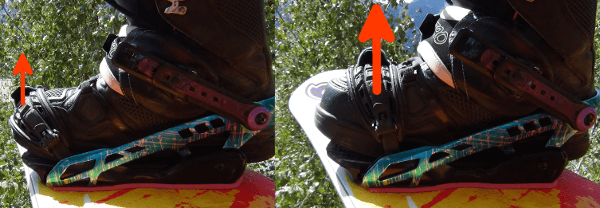
Ignore the red arrows. I think this image was taken for a different reason but this shows exactly what I’m talking about.
The image on the left shows how to correctly strap your toe strap. It’s done diagonally so that the strap is pushing your boots both downwards and also inwards. The right image shows how not to. If you strap it like the right, I guess you’re still safe. There’s no immediate danger but your boots might slide forward while riding (not fun) and only one strap’s basically doing all the work so you might snap that lol.
You’ll notice too that it’s easier to do a heel edge turn when the strap is strapped diagonally (easier to lift your toe and the board follows).
So if you’re unlucky enough that you’re shopping and you’re looking at a very old bindings, the old bindings were meant to be strapped on top of your foot (similar to the RIGHT image). Not really fun. If you’re shopping at modern shops, you most likely will not have this problem. So just inspect the toe straps.
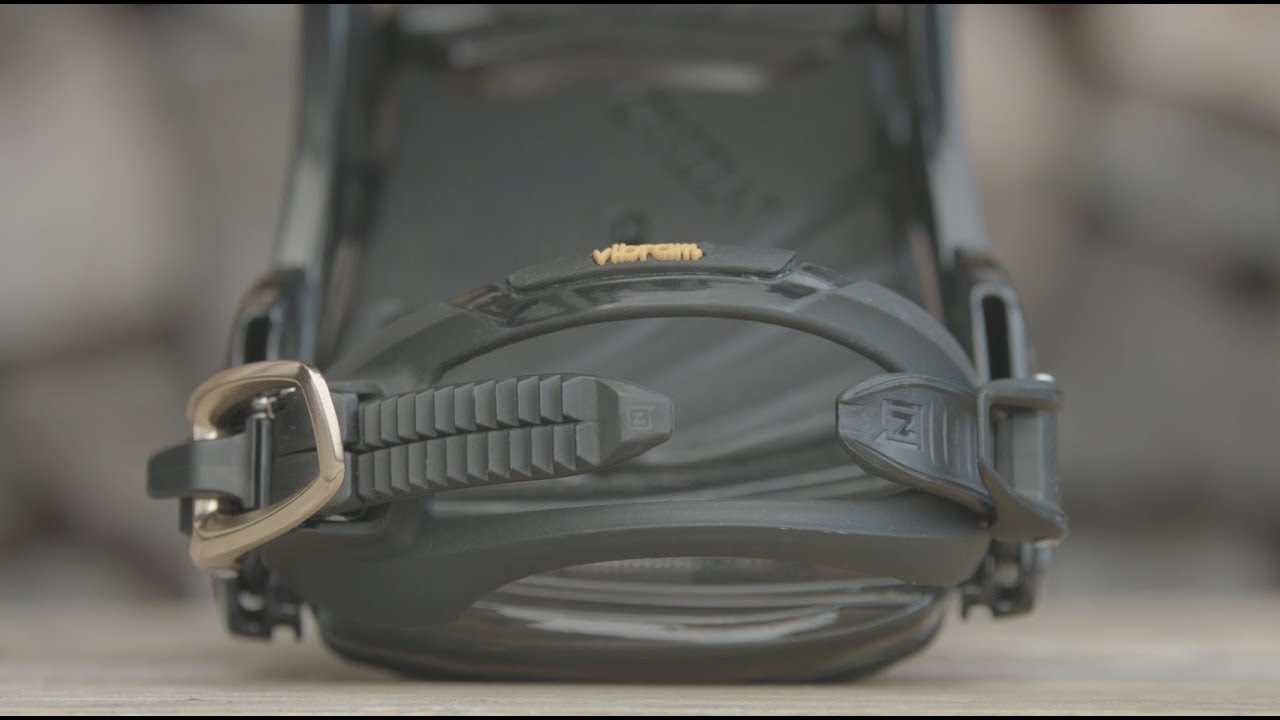
If the toe strap is solid and flat, that’s meant to be put on top (don’t get this if you can).
If the toe strap is flat but there’s a hole in the middle, this is ok because you can put it on top if you really want/need to but that hole in the middle allows if you want to strap yourself properly (strapping it against the corner of your boot–the left image above).
And then If the toe strap has an actual shape and you can see it’s only meant to be strapped with the corner of your foot, I’d say this is the most ideal.
Stiffness / weight
This one really isn’t a major concern especially if you’re starting. If you’re a beginner, you probably wouldn’t be able to tell how stiffness affects your riding…yet.
Pro tip: If you're a beginner, opt for the soft versions of everything: boards, boots, and bindings. This is much more useful especially when you're just trying to learn the sport. You can always gear upgrade and get the medium/stiff flex later on. If you get the stiff versions, it'll feel like your feet are bolted to the ground, you'll just trip even more, and it might cause injuries. You might not even have fun at all and you'd just abandon snowboarding forever.
I figured to add this because yes, get the soft-medium stiffness/flex level when buying. It’ll be easier to learn and improve.
At the same time, when you get more experience, I think it’s more desirable to get lighter bindings (they can be clunky and heavy) so I try to minimize this as much as I can.
Snow builds up too as you ride so sometimes. At the end of the day when you’re all drained and you have to carry your board, the bindings (and the built up snow) can feel like tons.
Wrap up
That’s it! I think these are the core factors to consider when considering snowboard bindings. Nothing fancy, just the essentials. There are also Burton Step Ons, Nidecker Supermatic, Flow bindings–strapless bindings for you to consider.
As much as possible, I wouldn’t suggest them when starting. They tend to be more expensive. Some strapless bindings can only use VERY specific boots. Sometimes, it’s strapless and comfortable but it’s in expense of other important factors of the binding. But just letting you know they exist.
Happy riding!